


Dynamic Lens Flare for DAZ Studio
 (No Ratings Yet)
Lens Flare Thru A Tree.
Here's another great product from the guys at Dreamlight. It's called Dynamic Lens Flare, and it does just as the name implies. It allows you to add lens flare to your renders dynamically without the need for you to do that in post work.
The way you use this Dynamic Lens Flare add-on is easy. All you have to do is add it to a camera (or cameras) in your scene and then you point a light source at the camera; for example, a spotlight.
Spotlights are the best light sources to use with the Dynamic Lens Flare add-on. You can use a distant light or even a point light but there are certain things you will need to know and do to get them working for you in your scene. The Dynamic Lens Flare manual explains all that to you in a very concise and direct manner.
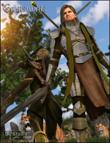
I have not done any work that has required the use of a lens flare since I bought the Dynamic Lens Flare add-on. So, to show you what this add-on can do, I decided to look for a photograph online with lens flare and try and get some inspiration from that to work out a quick example to show you. I Googled “lens flare” and came upon a lens flare tutorial where I found a photograph of a lens flare shining through a tree. “Perfect!,” I thought. I'll use that for my example.
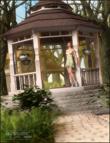
I soon got to work setting up my scene. I added a graveled ground, a tree, and threw in the Light Dome Pro 2.0 to use as a background.
The Light Dome Pro 2.0 add-on uses many lights to accomplish its outdoors lighting solution. So, I had to be careful to make sure I didn't get any lights from the package in front of the camera. I looked on the sky dome background where the sun should be at and positioned it behind the tree. I added a spotlight into the scene and then moved the spotlight behind the tree centering it where the sun in the background should be at in the sky.
I then added a lens flare to the camera, in this case the only camera in the scene—the default camera. Once I had the camera where I wanted it, I switched to Perspective View so as not to move the Default camera from its position, and continued to work on the spotlight. At this point, I added a spotlight pointer to the spotlight, another add-on from Dreamlight, to help me position the spotlight dead-on on the camera. Similar to the way a laser gun sight works.
Now, because I needed time to work out how I wanted the lens flare to look, I deleted the Light Dome Pro from the scene, this allowed me to do several test renders quickly as I got the lens flare just like I wanted it. I had to change many parameters to get it to the size, shape, and color I wanted. The Dynamic Lens Flare add-on brings 16 presets to help you get started as there are many parts to a lens flare: Bloom, Starburst, Raindow, and Spots. The add-on offers many parameters for everyone of those parts. You have total control of your lens flare!
Once that was done, I re-added the Light Dome Pro 2.0 add-on to the scene as before. I turned off all the other lights in the Light Dome Pro 2.0 add-on with the exception of the skylights. These two renders are what I finally got:
 |
|
|
| Figure 1: Lens Flare Thru A Tree Closeup. |
Figure 2: Lens Flare Thru A Tree. |